Creating surveys is one of the core features of ResearchPackage. This tutorial will guide you through how to create the needed domain model objects for a survey task, how to present it in the UI, how to combine different questions on one screen, and finally how to collect the results.
> Note: This tutorial is limited to present some of the survey types and give an introduction on how to combine them into one question (Form step). For all the available answer formats please see the list of available answer formats in the API tutorial.
Domain Model – Task, Step & Result
Overall, ResearchPackage uses a Task to represent the survey containing a list of Steps, which each returns a Result. In the API, the task is an RPOrderedTask object and the steps are RPQuestionStep objects. Results are saved as RPTaskResult objects. ResearchPackage also support a navigable tasks with the RPNavigableOrderedTask.
Details on the domain model can be found in the API documentation on pub.dev and the example app provide a set of examples on how to create surveys.
Survey Steps
Instruction Step
You can present instructions to the user, put them to context or show footnotes with the RPInstructionStep. An instruction step is useful any time you want to provide some instruction for the user at the beginning or during a survey. Here’s how you can create one:
RPInstructionStep instructionStep = RPInstructionStep(
    identifier: "instructionID",
    title: "Instructions",
    detailText: "For the upcoming questions choose the answer closest to how you feel",
    footnote: "(1) Important footnote",
    imagePath: "assets/images/waving-hand.png",
    text: "Please indicate for each of the five statements which is closest to how you have been feeling over the last two weeks. Notice that higher numbers mean better well-being.",
);
Question Step
A RPQuestionStep is a generic step that needs a child of RPAnswerFormat on which depends what kind of question will the step present. You can create as many question steps as you want. The available answer formats in ResearchPackage is listed below. A simple example of a question step asking about smoking (yes/no) would look like:
List<RPChoice> yesNo = [
  RPChoice(text: "Yes", value: 1),
  RPChoice(text: "No", value: 0),
];
RPChoiceAnswerFormat yesNoAnswerFormat = RPChoiceAnswerFormat(
  answerStyle: RPChoiceAnswerStyle.SingleChoice,
  choices: yesNo,
);
RPQuestionStep smokingQuestionStep = RPQuestionStep(
  identifier: "booleanQuestionStepID",
  title: "Do you smoke?",
  answerFormat: yesNoAnswerFormat,
);
Form Step
There are situation when it’s beneficial to show multiple questions on the same page as one logical block. For this use case, the RPFormStep can be used. A form step consists of multiple RPQuestionStep steps. The form step is showing the question steps as a scrollable list. The UI looks like this:
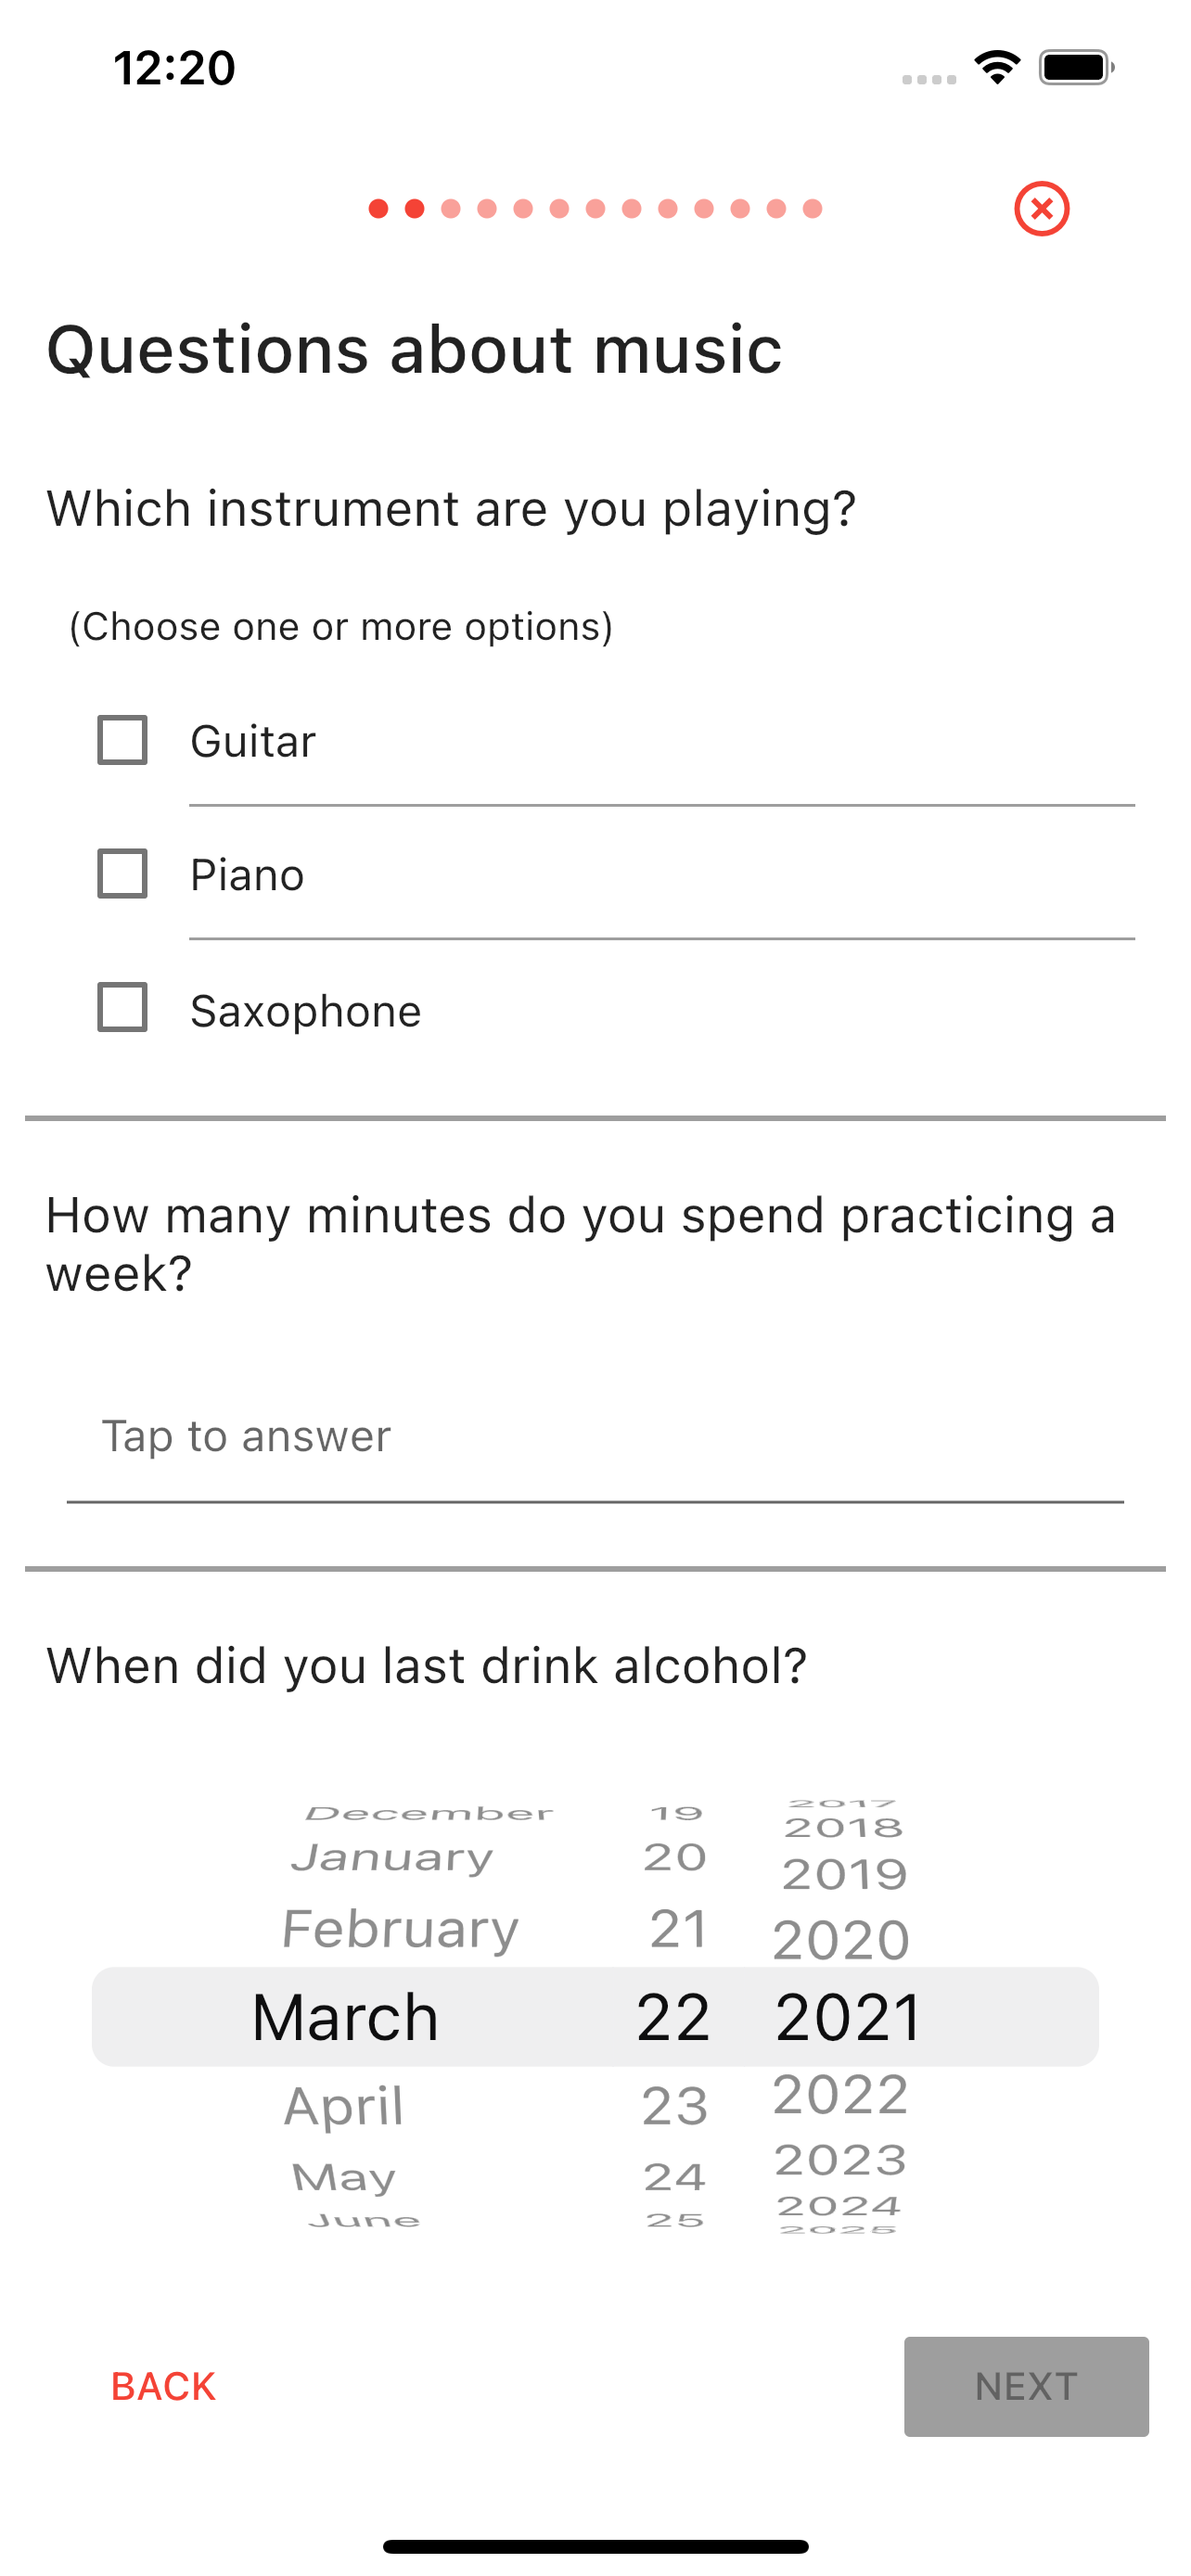
To create a form step works, first create the question steps to be shown on the page:
// Question 1
RPQuestionStep instrumentChoiceQuestionStep = RPQuestionStep(
    identifier: "instrumentChoiceQuestionStepID",
    title: "Which instrument are you playing?",
    answerFormat: instrumentsAnswerFormat);
// Question 2
RPQuestionStep minutesQuestionStep = RPQuestionStep(
    identifier: "minutesQuestionStepID",
    title: "How many minutes do you spend practicing a week?",
    answerFormat: minutesIntegerAnswerFormat);
// Question 3
RPQuestionStep dateQuestionStep = RPQuestionStep(
    identifier: "dateQuestionStepID",
    title: "When did you last drink alcohol?",
    answerFormat: dateAnswerFormat);
Then, after the question steps are created add them to the constructor of a Form Step as a list.
RPFormStep formStep = RPFormStep(
  identifier: "formstepID",
  steps: [instrumentChoiceQuestionStep, minutesQuestionStep, dateQuestionStep],
  title: "Questions about music",
);
> What Answer Format does the Form Step have?
As every question step, a form step also needs an answer format. Since it has multiple questions embedded it would be difficult to figure out which answer format to use. To solve this, ResearchPackage has a special answer format; the RPFormAnswerFormat. Since a form step can only take this specific answer format you don't have to parse it. ResearchPackage sets the corresponding value automatically as part of the constructor.
Completion Step
Although it’s not mandatory, creating a completion step and appending it to the list of steps is a good design choice because we can inform the user that they completed the survey. Here’s how to create an RPCompletionStep:
RPCompletionStep completionStep = RPCompletionStep(
  identifier: "completionID",
  title: "Finished",
  text: "Thank you for filling out the survey!",
);
Timer Step
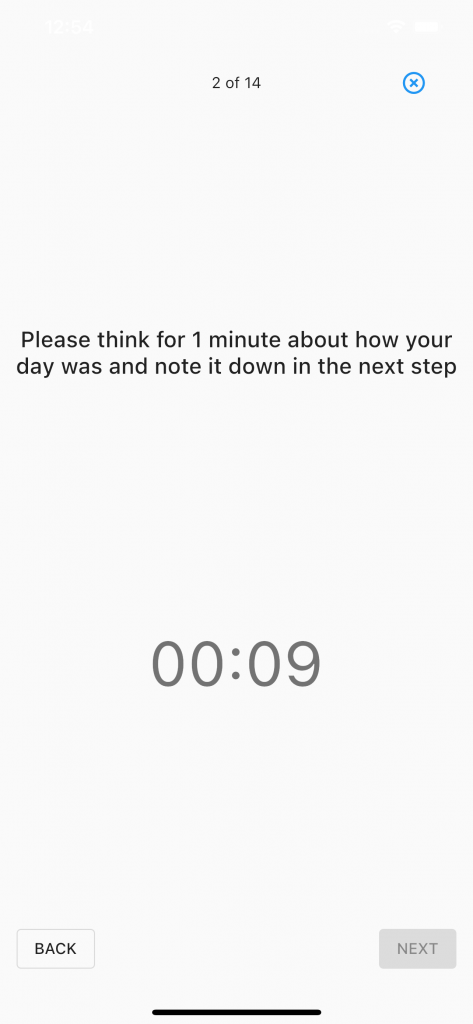
The RPTimerStep is a step in where the user must wait a specified amount of time before continuing to the next step in the task. A timer is displayed in the middle of the screen along with a message about why the timer is there. The step also has the option playSound which – if true – will play a sound when the timer is completed.
Use cases could be e.g. a step where the user must remember certain things about their day or if paired with the Cognition Package, it could be a timeout between two recall tasks.
RPTimerStep timerStep = RPTimerStep(
  identifier: 'RPTimerStepID',
  timeout: Duration(seconds: 60),
  title:
      "Please think for 1 minute about how your day was and note it down in the next step",
  playSound: true,
);
Below is an example of how it would look in an app:
Answer Formats
Each question step take a specific answer format. Currently, the following answer formats are available.
Single Choice
In order to create the question step we have to set up the answer format first with a list of choices (RPChoice) and the answer style. An RPChoice has a text which will be presented to the participant and a value which can be used for other purposes. When saving the result both of the fields will be saved. The UI representation of this answer format looks like this: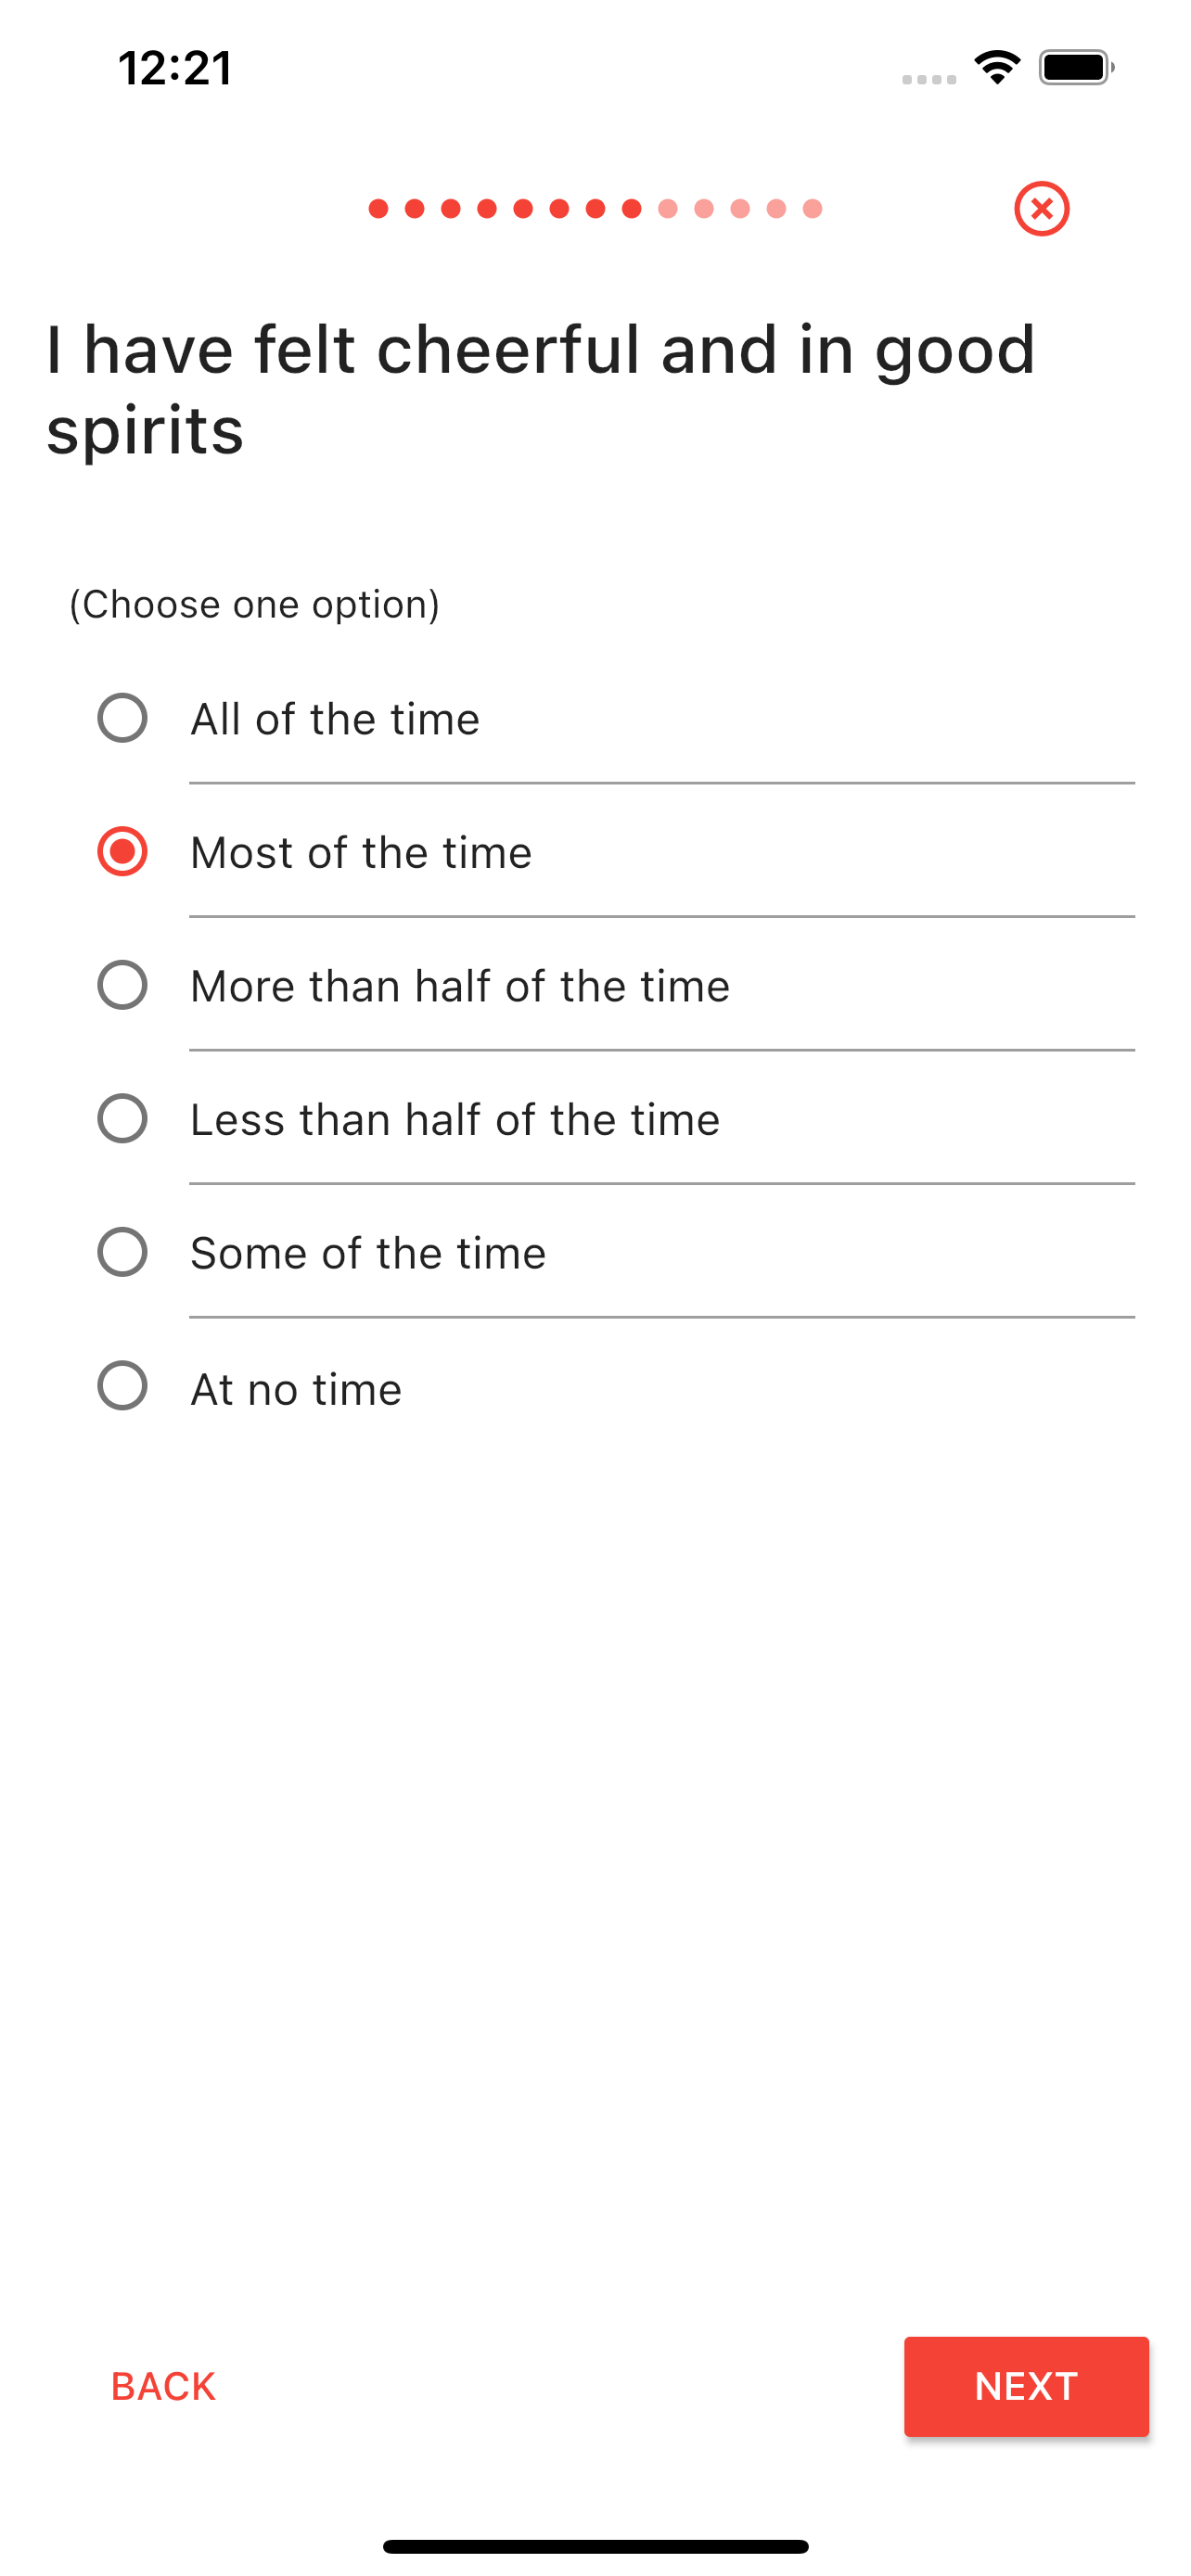
Here’s how to create a single choice answer format:
// First create the list of choices
List<RPChoice> choices = [
  RPChoice(text: "All of the time", value: 5),
  RPChoice(text: "Most of the time", value: 4),
  RPChoice(text: "More than half of the time", value: 3),
  RPChoice(text: "Less than half of the time", value: 2),
  RPChoice(text: "Some of the time", value: 1),
  RPChoice(text: "At no time", value: 0),
];
After that the choices can be passed to the constructor of a choice answer format:
// Pass the list of choices to the answer format constructor
RPChoiceAnswerFormat myAnswerFormat = RPChoiceAnswerFormat(
  answerStyle: RPChoiceAnswerStyle.SingleChoice,
  choices: choices,
);
A single choice question format allows the user to pick one single element from a previously created set of options. The easiest way to create this step is by using the constructor as the following:
RPQuestionStep myQuestionStep = RPQuestionStep(
  identifier: "questionStepID",
  title: "I have felt cheerful and in good spirits",
  answerFormat: myAnswerFormat,
);
Multiple Choice
The multiple choice question is similar to the single choice with the difference that the participant is allowed to choose more than one option from the presented choices. The UI representation of this answer format looks like this (see that the small hint text below the title has changed indicating that the participant is allowed to choose more options as well): 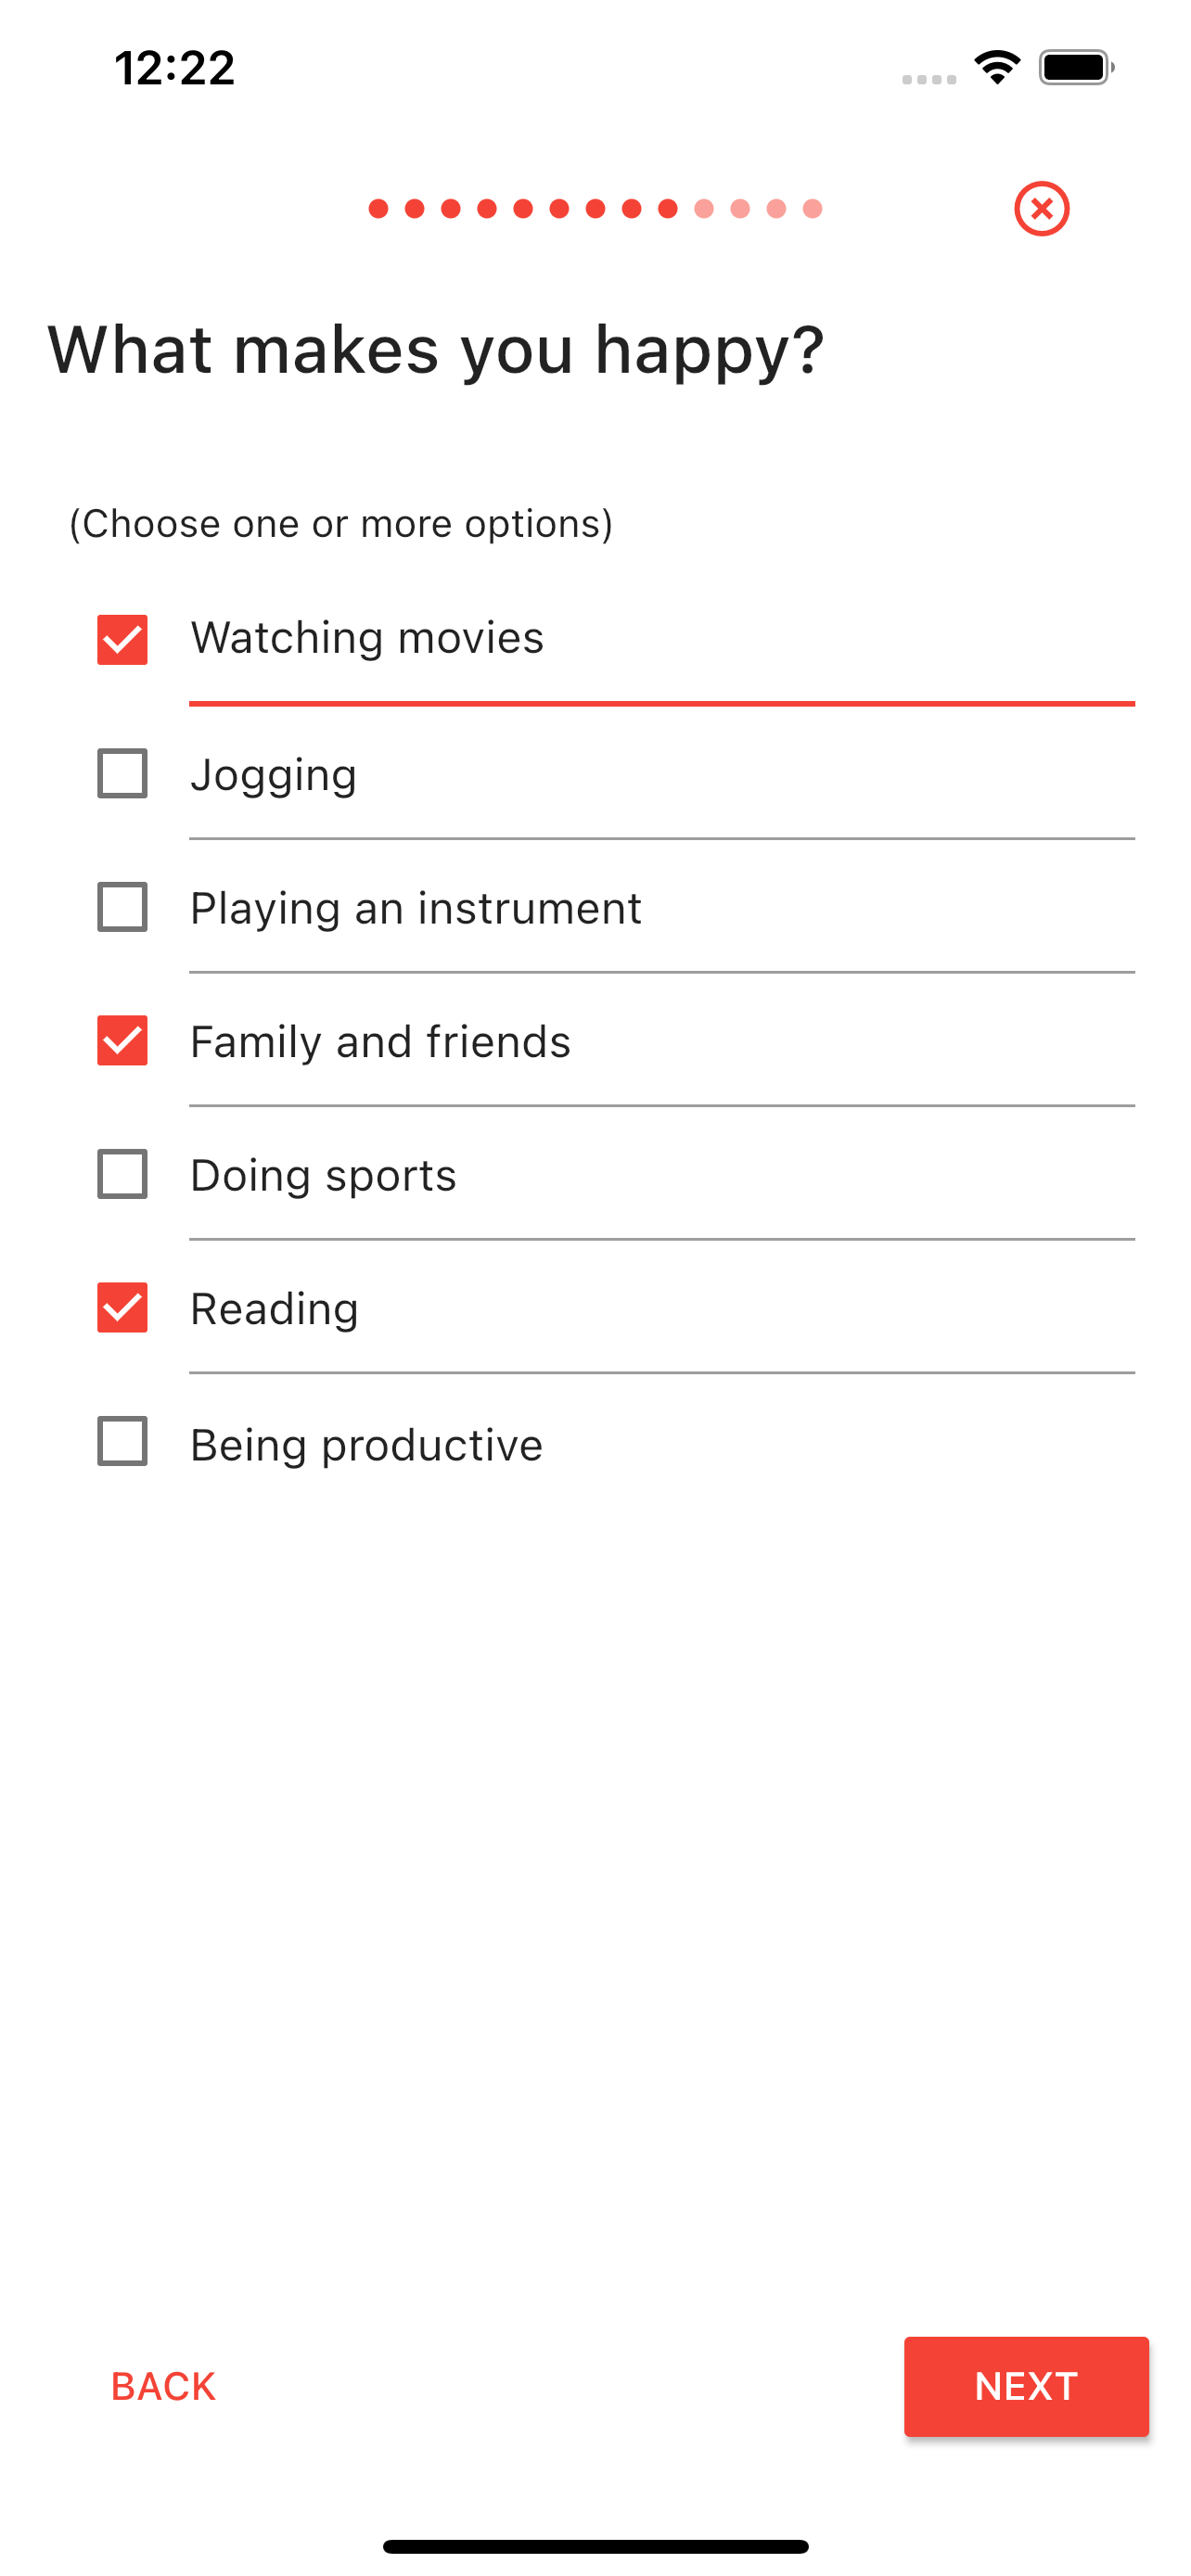
The creation of a question step like that is similar to the single choice answer format presented above. First the RPChoice objects need to be created and then passed to the the constructor of the RPChoiceAnswerFormat used with the multiple choice RPChoiceAnswerStyle like this:
// Pass the list of choices to the answer format constructor
RPChoiceAnswerFormat multipleChoiceAnswerFormat = RPChoiceAnswerFormat(
  answerStyle: RPChoiceAnswerStyle.MultipleChoice,
  choices: choices,
);
Integer
Using an integer answer format, participants can enter a number within an predefined range. A suffix can be specified indicating for example the unit of the number (e.g. kg, years, cm…).
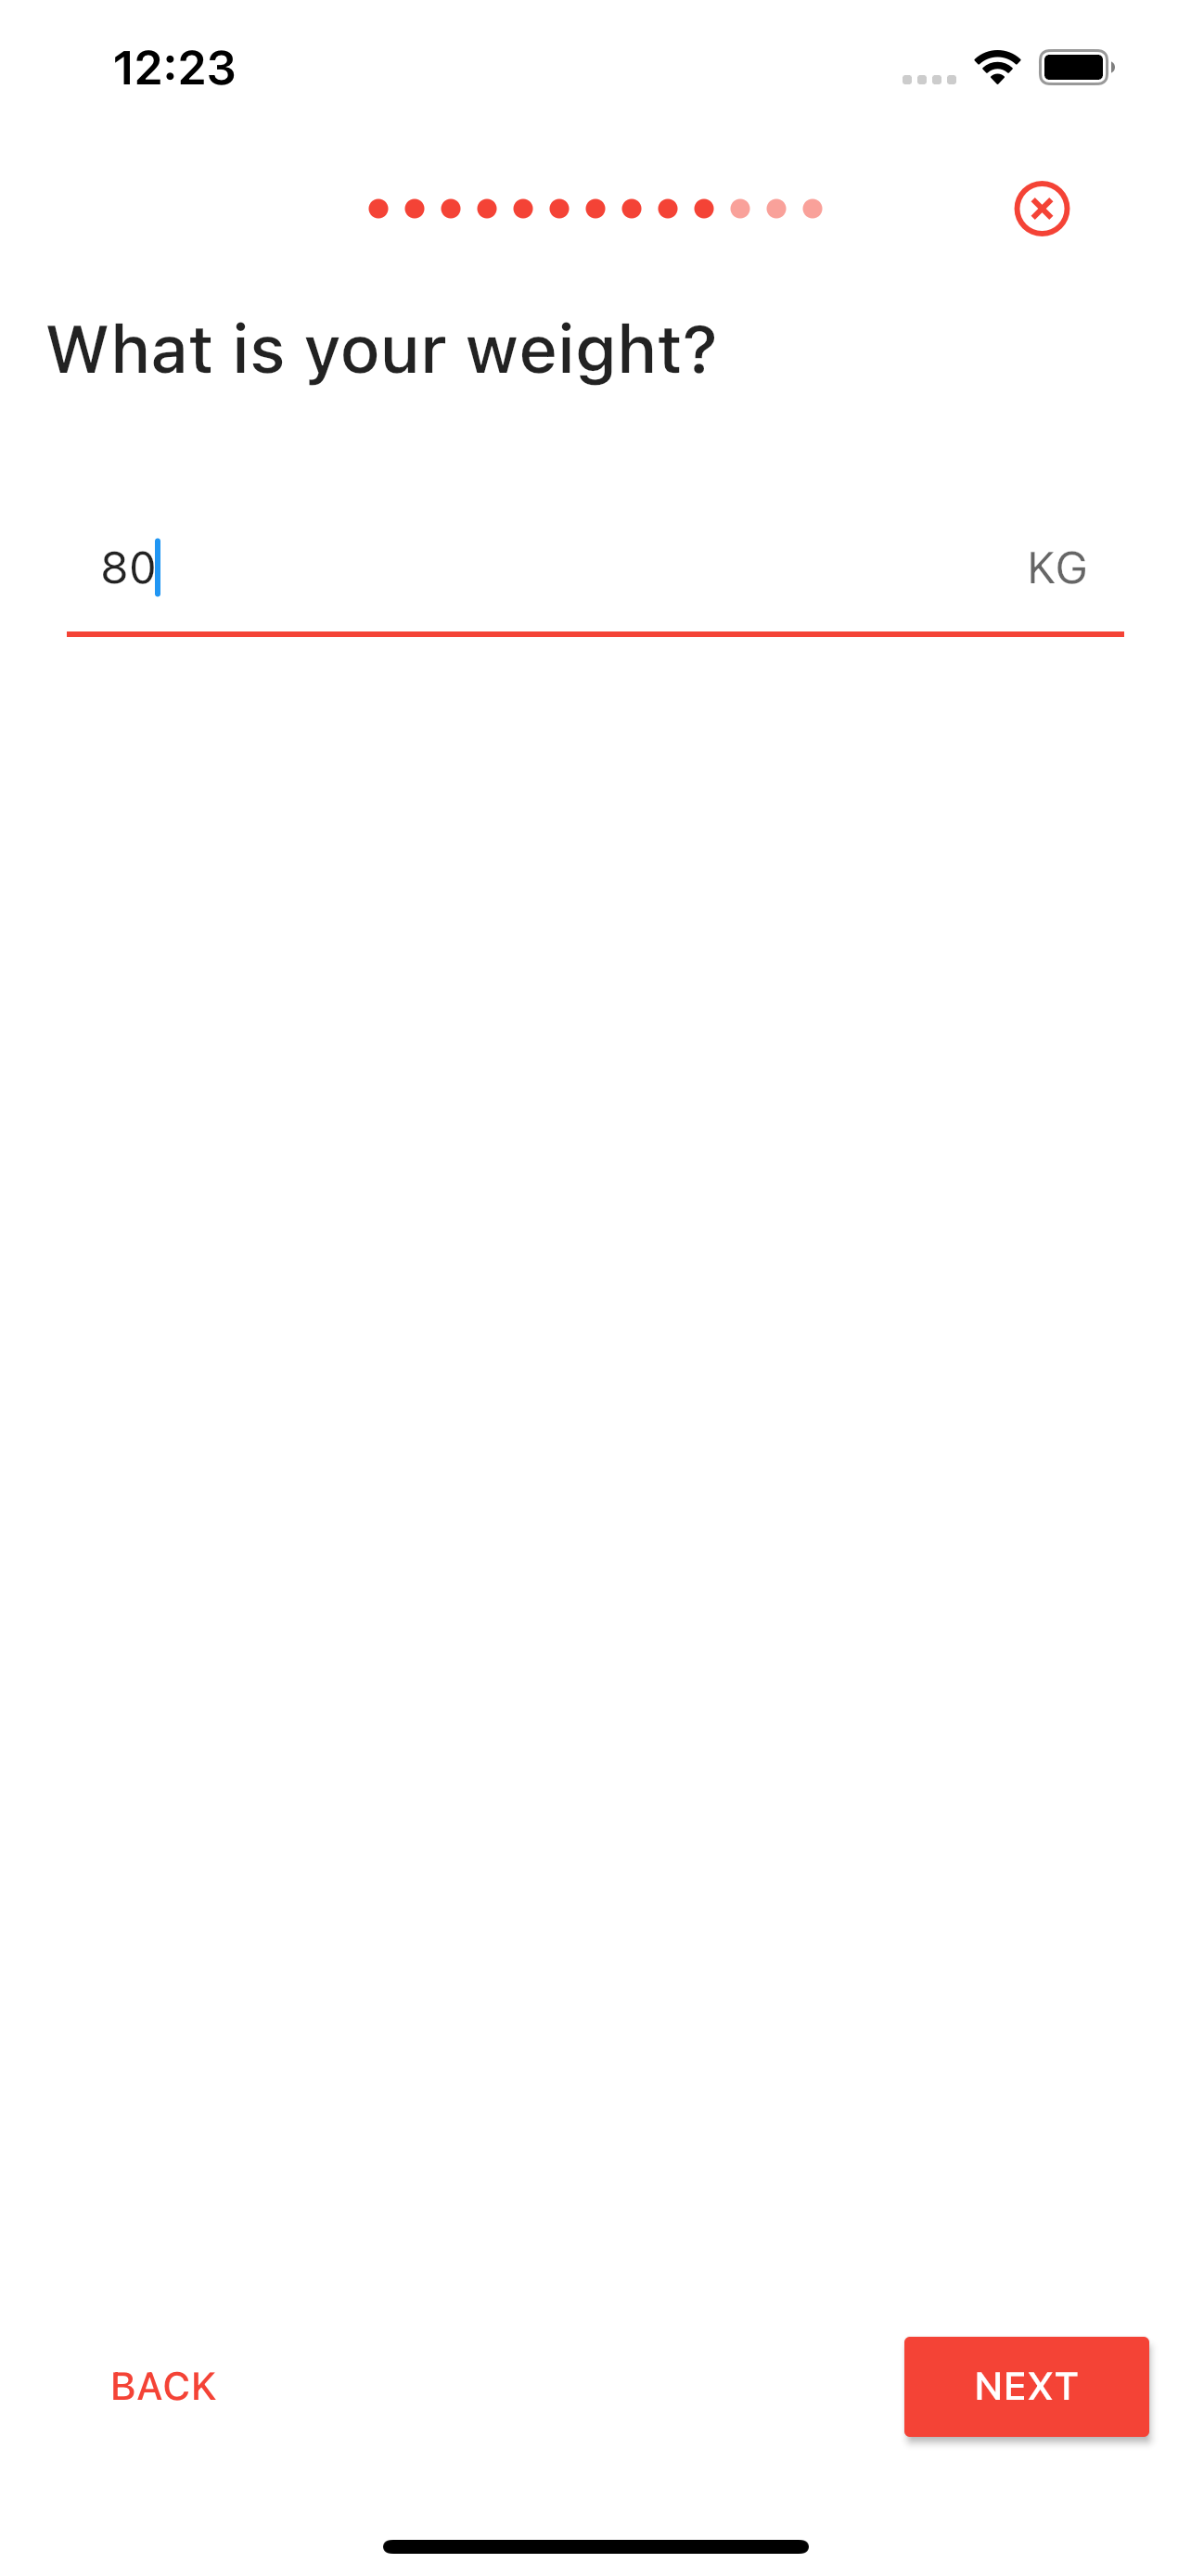
The RPIntegerAnswerFormat needs to be instantiated by giving the constructor the lower limit, the upper limit and the suffix.
RPIntegerAnswerFormat weightIntegerAnswerFormat =
    RPIntegerAnswerFormat(minValue: 0, maxValue: 200, suffix: "KG");
Research Package will check if the input is an actual number and between the limits and lets the participant proceed only if these conditions are met.
Additional Parameters
The ‘Optional’ parameter
Some question in your survey might not be crucial information, and you can use the ‘optional’ parameter on RPQuestionStep and RPFormStep. If the question is set as optional then the UI will show a small text below the question (“Skip this question”) which the user can press to move to the next question without answering. The result for that particular question will be set as null. See the image below: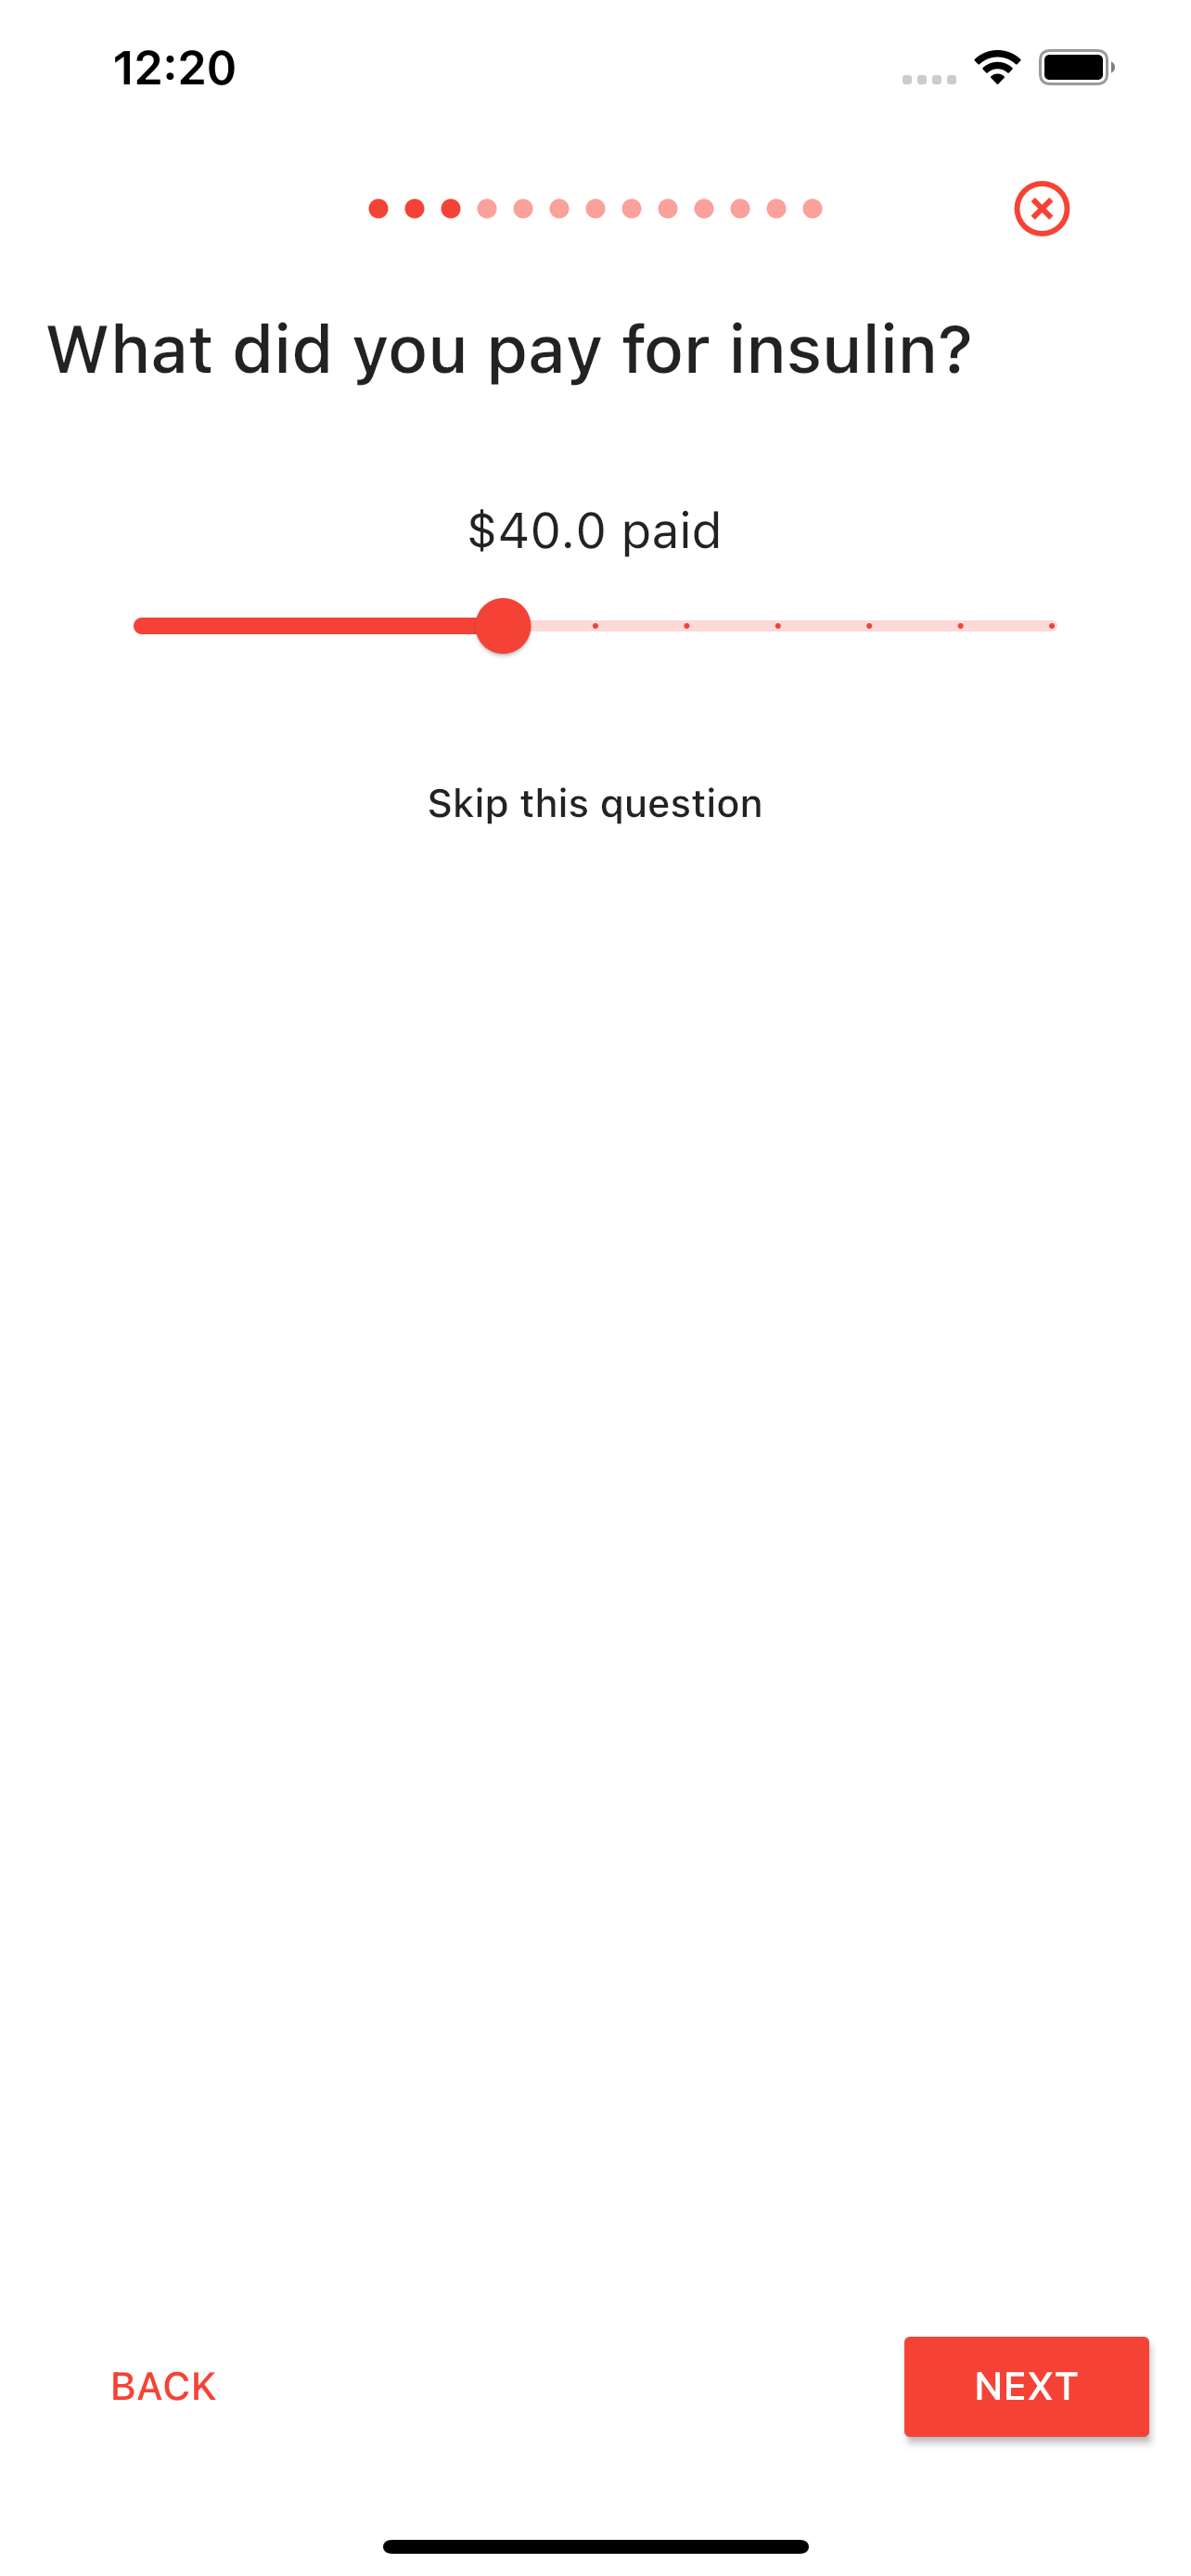
The text field choice
The RPChoice also has the parameter ‘isFreeText’. If the choice is marked as free text then the user can enter a custom string into the choice. This can be used for questions where the predefined answers aren’t enough. The ‘text’ parameter is used as the hint-text for the text field instead. Below is an example where the user has entered “Watching movies” as an answer.
Creating the Survey Task
Now that you have all the needed steps, you can create the task for the survey. This is done by creating a RPOrderedTask or RPNavigableOrderedTask object with list of steps defined previously:
RPOrderedTask linearSurveyTask = RPOrderedTask(
  identifier: "surveyTaskID",
  steps: [
    instructionStep,
    formStep,
    smokingQuestionStep,
    additionalInfoQuestionStep,
    completionStep
  ],
);
The ‘closeAfterFinished’ parameter
The RPOrderedTask and RPNavigableOrderedTask both have the parameter ‘closeAfterFinished’. If the parameter is set as false then the Route with your RPUITask will run your onSubmit-callback and NOT call Navigator.pop() automatically. If left as the default (true) then the Route will be pop’ed and will return to the previous Route in the stack.
Presenting the Task
The next step is to present the task you created. To achieve this you have to use the UI library of Research Package. The RPUITask class will automatically present the task based on the Step objects in the Task object. It also gives you the possibility to gather the results (for the result domain model, see the next section). This widget returns a full screen Scaffold widget so the recommended usage is to create a route which returns an RPUITask and then navigate to this route. The minimum example is the following:
class SurveyTaskRoute extends StatelessWidget {
  @override
  Widget build(BuildContext context) {
    return RPUITask(
      task: surveyTask,
      onSubmit: (result) {
        // your code
      },
      onCancel: (RPTaskResult? result) {
        // your code
      },
    );
  }
}
Collecting Results
When a step is done by the user, it produces a corresponding result object. These are all RPStepResult objects. Results from a task is stored in a RPTaskResult object. Each time a RPStepResult is produced by the user answering a question, it is stored immediately in the RPTaskResult.
Every result (classes that extend the RPResult) has an identifier which connects it to the task or step which produced it. The identifier of the result is identical to the identifier of its task or step. Each result also has a startDate and an endDate property storing the timestamp of when the step / task was started and finished. However, the RPSignatureResult does not have its startDate filled out. In this case, only the endDate is relevant which is the time of the signature.
The result hierarchy corresponds closely to the hierarchy of the building model of tasks and steps.
Gathering the results from a task can be done by passing a callback function to the RPUITask widget’s onSubmit input parameter. The onSubmit event is triggered when the user finish the last step in the the list of steps passed to the task object. This callback function provides the RPTaskResult object as a parameter for the app to pick up, if needed.
The example show how to set up a callback function to get the results of a survey task.
void resultCallback(RPTaskResult result) {
    // Do anything with the result
    print(result.identifier);
  }

...

Widget build(BuildContext context) {
    return RPUITask(
      task: surveyTask,
      onSubmit: resultCallback,
    );
  }
The RPUITask also has an onCancel callback. The onCancel is an optional parameter which is called if the task is canceled instead of completed. The callback takes a nullable RPTaskResult as argument and the app can use this partial result to see how much was actually collected before the task was cancelled.
Widget build(BuildContext context) {
    return RPUITask(
      task: surveyTask,
      onSubmit: resultCallback,
      onCancel: (RPTaskResult? result) {
        if (result == null) {
          print("No result");
        } else
          print(result);
      },
    );
  }
RPNavigableOrderedTask
The RPNavigableOrderedTask is the second type of task ResearchPackage offers. It is used in the case where your survey should not necessarily go through all your questions. How the navigation functions is based on the RPStepNavigationRules added by you. If a rule is not specified for the step then it goes to the next in the ordered list.
RPStepReorganizerRule
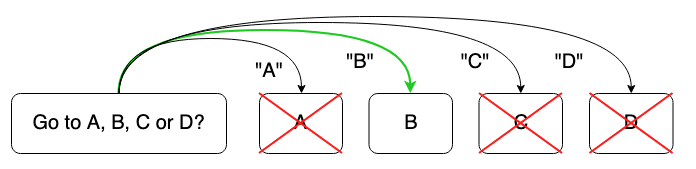
The RPStepReorganizerRule removes all steps that the answer doesn’t jump to, specified by the reorderingMap. The code snippet below redirects the survey to InstructionStep A, B, C or D depending on the answer, and every other step in the survey is removed.
RPStepReorganizerRule alphabetReorganizerRule = RPStepReorganizerRule(
    reorganizerStepId: alphabetQuestionStep.identifier,
    reorderingMap: {
      3: instructionStepD.identifier,
      2: instructionStepC.identifier,
      1: instructionStepB.identifier,
      0: instructionStepA.identifier
    });
In the example below, the user answers B – A, C and D is removed. The survey will end because all the other steps were removed.
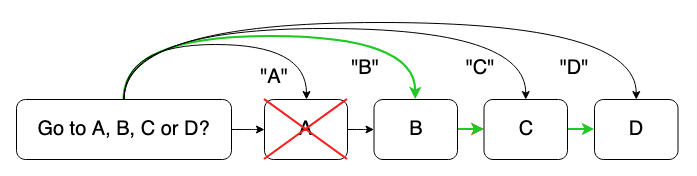
RPStepJumpRule
The RPStepJumpRule will jump from the current step to any other step in the rest of the survey depending on the answer of the question. Below is an example of a question where the rules dictates that the survey will jump to InstructionStep A, B, C or D depending on the answer value. The value is from the value of the RPChoice and will map to the identifier of the next step that it should jump to.
Remember that it does not remove the other steps so if it jumps to InstructionStep A while B, C and D come afterwards in the order of steps, then these steps will also show unless otherwise avoided. But jumping to D would avoid all the other InstructionSteps.
If the map does not contain an answer also specified in the answerMap, then it automatically moves to the next question in the ordered list.
RPStepJumpRule rpStepJumpRule = RPStepJumpRule(
    reorganizerStepId: alphabetQuestionStep.identifier,
    answerMap: {
      3: instructionStepD.identifier,
      2: instructionStepC.identifier,
      1: instructionStepB.identifier,
      0: instructionStepA.identifier
    });
As an example here, the user has selected “B” and will as a result skip A, but not C and D.
RPDirectStepNavigationRule
The RPDirectStepNavigationRule is used for cases where the survey has to jump unconditionally to another step instead of the next step in the ordered list. Below is a continuation of the RPStepJumpRule example, where the survey jumps from “B” to a “New question”. This way the survey can skip the C and D steps if those were not necessary after the B step.
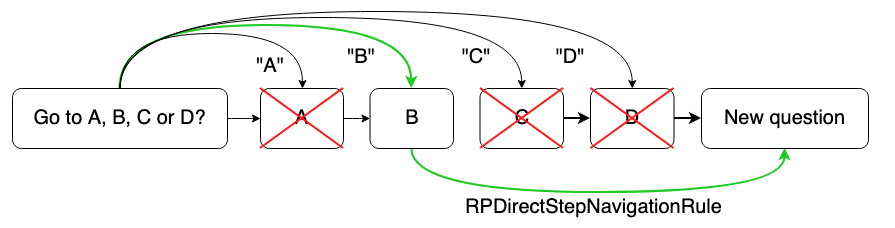
Creating a RPDirectStepNavigationRule is done by simply giving the destination step’s identifier. As shown later, the NavigationRule is set for a step as part of the ‘setter’. In the section “Adding the NavigationRule to the Task” you can see how it is added to a specific step to enable a “from” and “to” in the navigation.
RPDirectStepNavigationRule navigateToNextQuestion =
    RPDirectStepNavigationRule(alphabetQuestionStep2.identifier);
Adding the NavigationRule to the Task
To insert the NavigationRules into the task use the setter setNavigationRuleForTriggerIdentifier to add the specific rule for a step. The setter takes the rule and the identifier of the step where the rule must be applied. Below the rpStepJumpRule is applied to the alphabetQuestionStep and will navigate accordingly.
RPNavigableOrderedTask navigableSurveyTaskRPDirectStepNavigationRule =
    RPNavigableOrderedTask(
  identifier: "NavigableTaskID",
  steps: [
    alphabetQuestionStep,
    instructionStepA,
    instructionStepB,
    instructionStepC,
    instructionStepD,
    alphabetQuestionStep2,
  ],
)
      ..setNavigationRuleForTriggerStepIdentifier(
          rpStepJumpRule, alphabetQuestionStep.identifier)
      ..setNavigationRuleForTriggerStepIdentifier(
          navigateToNextQuestion, instructionStepB.identifier);