This is a step-by-step guide on how you – as a study participant – can install and use the CARP Studies App. If you are new to CARP, you can read more about the Copenhagen Research Platform and the Department of Health Technology at the Technical University of Denmark, which is hosting CARP and responsible for CARP studies.
To use the CARP Studies App, please follow these steps:
- You will receive an email invitation to create an account on the CARP system.
- Install the app on your phone (iOS or Android).
- Authenticate (login) to CARP and accept the invitation to the study you are participating in.
- Go through the informed consent and sign it.
- Provide the necessary permissions to the app.
- Navigate the app, like reading about the study and viewing the data collected.
- Connect wearable devices.
- Perform study-related tasks.
In the following, we will describe each of these steps.
1. Receive Emails to Create a CARP Account and Join a Study
When a researcher enrolls you in a CARP study, you will receive a personal invitation via email. You will receive two emails, one of which will welcome you to the study, and another asking you to create a user account (if you do not have this already).
In the “Update your account” email, click the link to create your account. This will bring you to the CARP system, where you should enter your first and last name, and create a password. Write down your username (email address) and password since you will need this to log into the app later.
2. (Re)install the Studies App
First, you must update your phone to the latest operating system. Please follow the official guidelines for iOS or Android below:
Then, if you have the CARP Studies App installed previously, delete the old version of the app by long-pressing the app icon and clicking “Uninstall” (on Android) or “Remove App” (on iPhone).
Now download and install the CARP Studies App for your iOS or Android phone using the links below.
 iOS |  |  ANDROID |
3. Logging into the Studies App and Accepting a Study Invitation
Once you have installed the Studies App on your phone, you can open it and authenticate to the app and the CARP Web Service, which holds your study invitation and stores the data collected. This flow is illustrated below (for iOS). Once you have logged in, you can access the study you have been invited to. Follow the steps below to sign in and accept a study invitation.
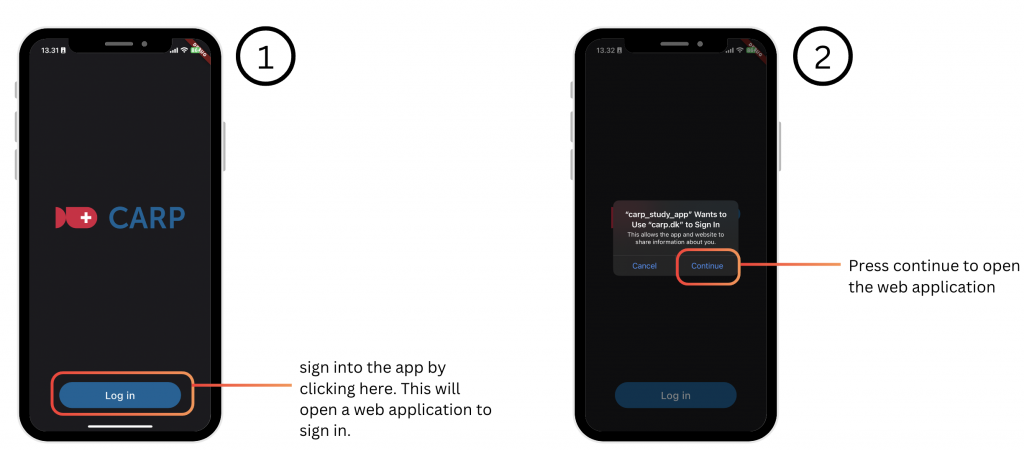
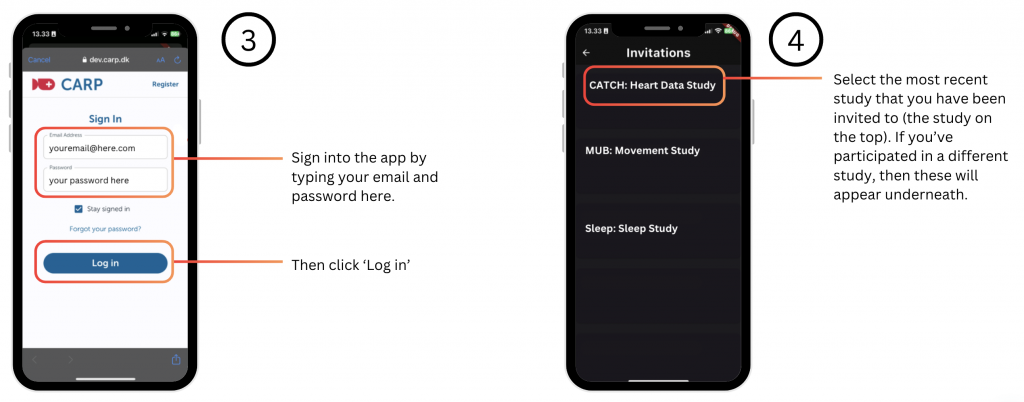
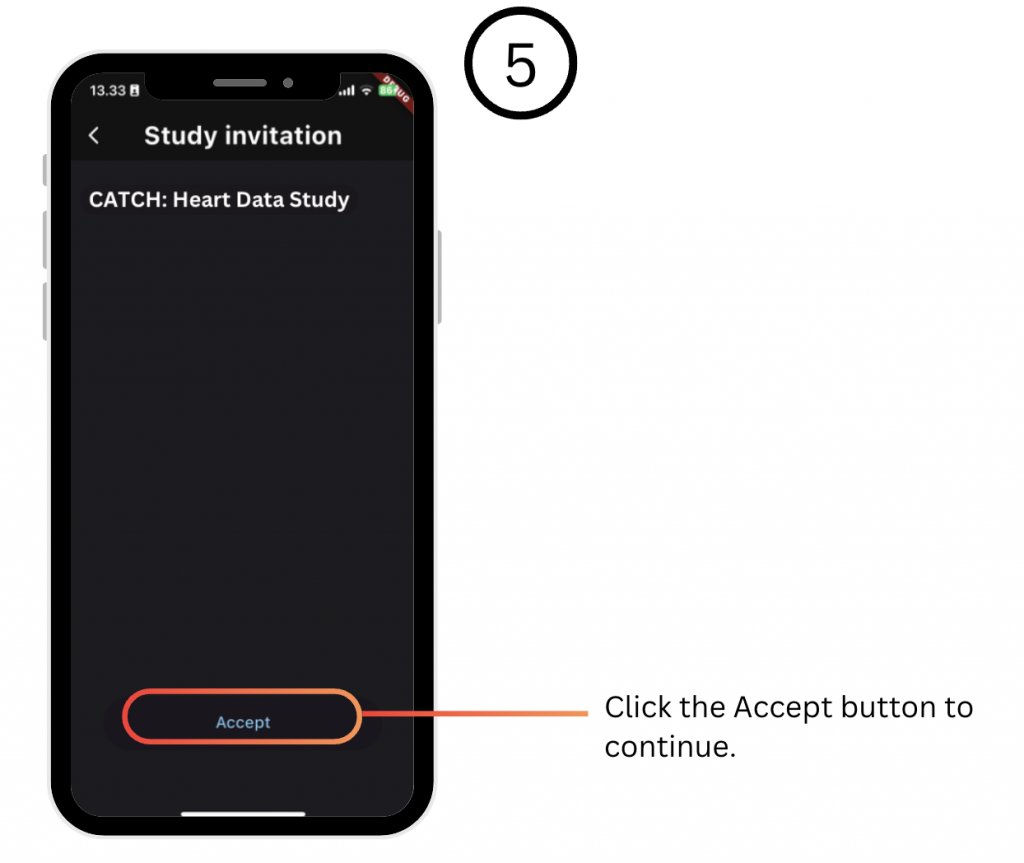
First, press the “Log in” button to start the login process. This will open a new window where you fill in the email and password you created in Step 1. Note that on some operating systems (like iOS) you need to grant the app access to sign in via the “carp.dk” domain (see image 2 above). Then input your email and password that you created in ‘1. Invitation to Create CARP Account’. Then, choose the study that you were invited to join.
4. Read the Informed Consent and Sign it
Once you’ve accepted a study invitation, you will be shown an informed consent form which contains all the relevant information for the study. It is important that you read the informed consent carefully, and sign at the end.
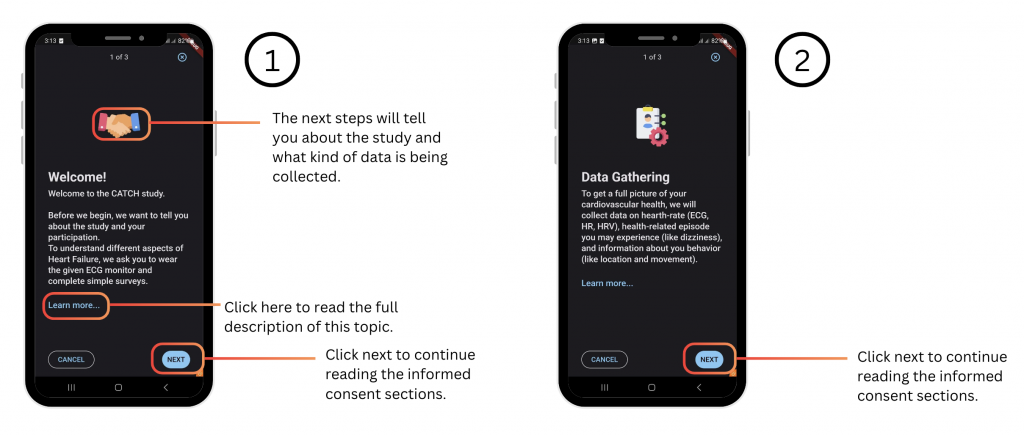

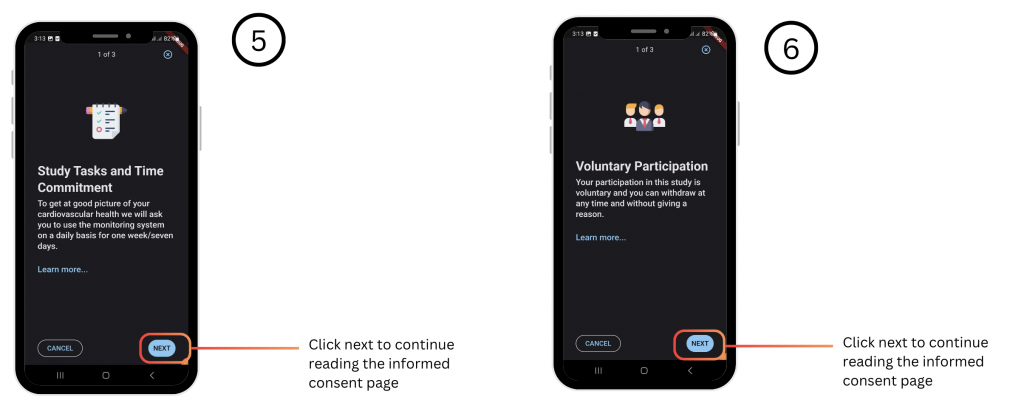
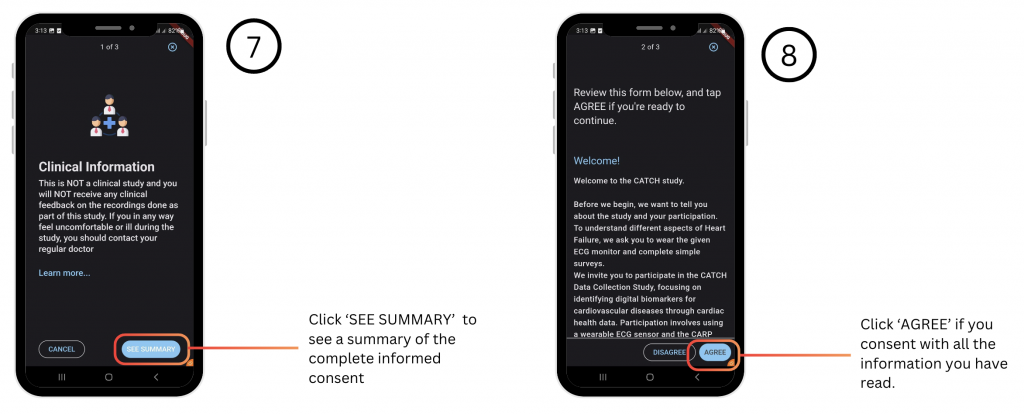
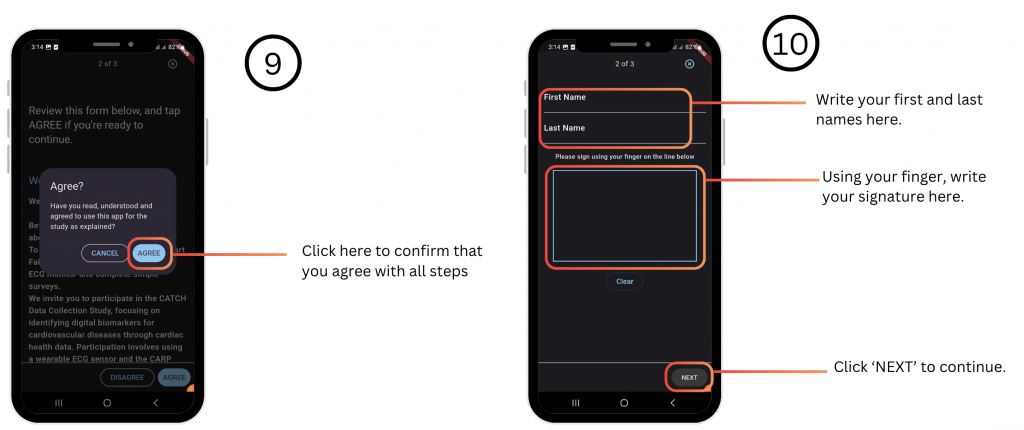
To read the informed consent, press ‘NEXT’ on every page to proceed to the following page. In Step 7, click ‘SEE SUMMARY’, and then ‘AGREE’ if you consent to all the information you have read (shown in Steps 8 and 9 above). To finish, write your first and last names in the respective boxes and sign with your finger in the box shown in Step 10.
5. Allowing Permissions to the Studies App
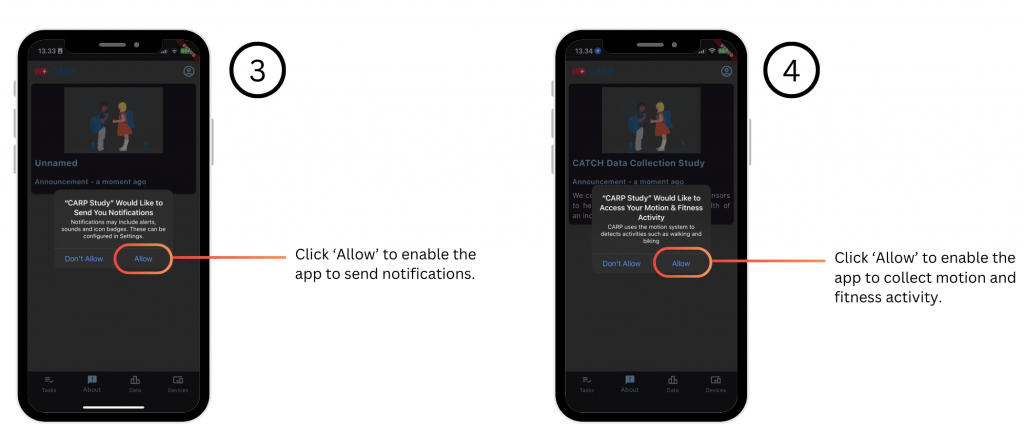
An important aspect of participating in a study is that some type of data is collected without you having to do anything because the app collects data automatically via the phone and its sensors. For example, the app collects information on location, steps, noise, and nearby devices. Therefore, to participate in the study, you should allow the phone to collect all the data it asks for. Depending on the different operating systems (iOS or Android), this will look a little different on your phone. But it is important that you allow the app to access the different types of sensors and services, like:
- Location
- Microphone and Camera
- Fitness / Motion / Activity Data
- Bluetooth (“Nearby Devices”)
- Notifications
A special note on location permissions: You will see three prompts for setting up permissions to access location information. First, the app shows a popup window explaining why the app needs access to location information for the specific study. Then the operating system (OS) shows a popup window asking you to allow the CARP Studies App to use your location “while using the app”. Finally, at a later stage, the operating system will ask if the app can access your location “Always”. This flow is shown below.
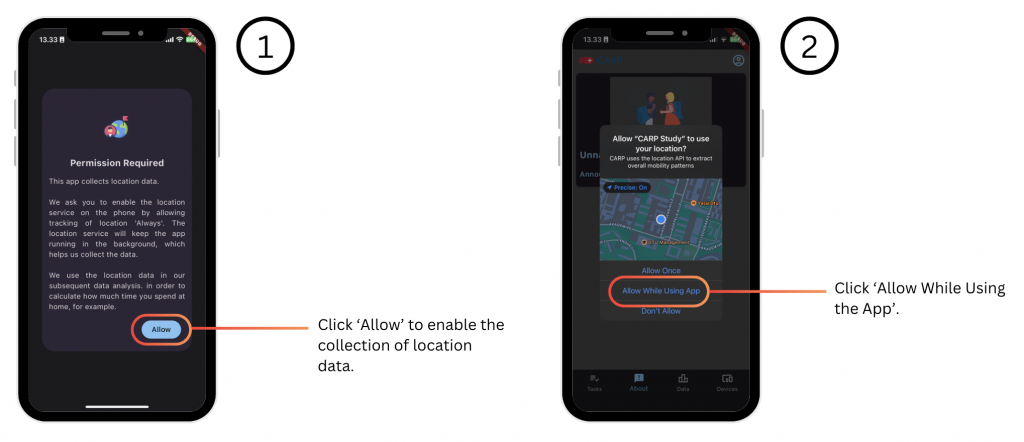
The app needs to use the location service, also while you are not using the app (in the “background”). Therefore, you should allow the app to access your location “Always”. Note that the app does not reveal your exact location, but uses the location information collected to derive higher-level location features, like calculating how much time you spend at home or how much you travel during a day. In general, you can read more about how we collect and handle data in the Privacy Policy of the app.
6. Navigating the App
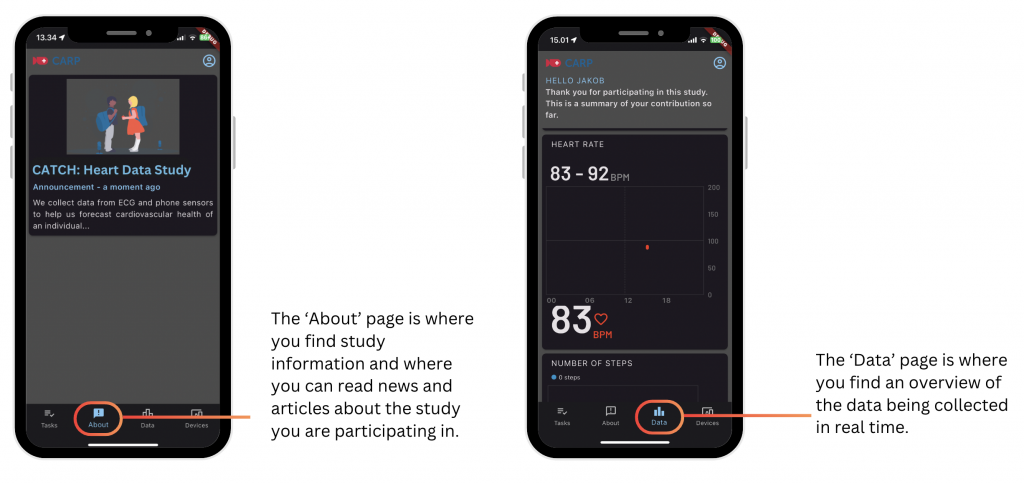
Once you have done this onboarding process, the app is ready to use on a daily basis. The app has four pages accessible from the bottom menu:
- The About page – here you read about the study and announcements, like newsletters about the study, that you are participating in (top left image).
- The Data page – here you can see a visualization of the health data the app is collecting, such as the number of steps, your heart rate, etc. (top right image).
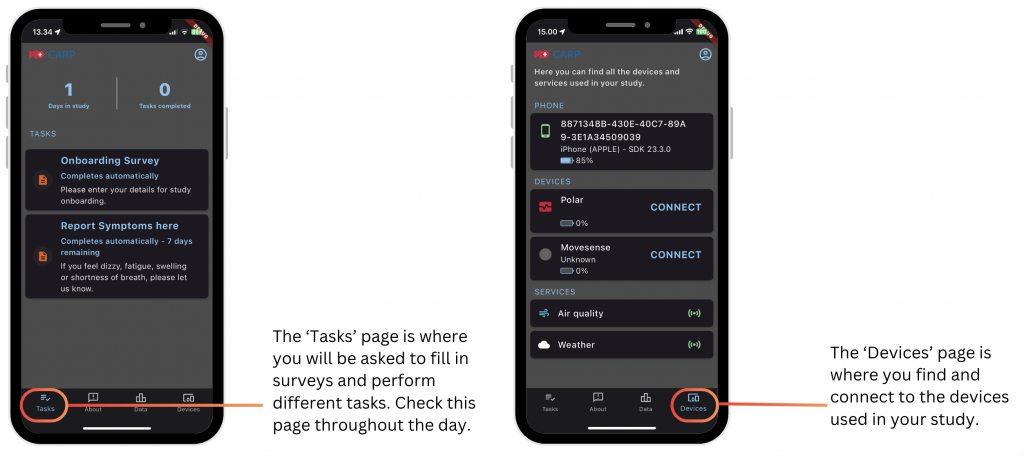
- The Tasks page – here you can see a list of tasks you have to do as part of the study, like filling in surveys or doing small cognitive testing tasks (bottom left image).
- The Devices page – here you can connect to the devices that are needed as part of the study, such as a heart rate monitor or a fitness watch (bottom right image).
7. Connecting a Wearable Device
Some studies will ask you to connect a wearable device to the app using Bluetooth. For example, a fitness watch or a heart rate monitor. The steps to connect a device are shown below.
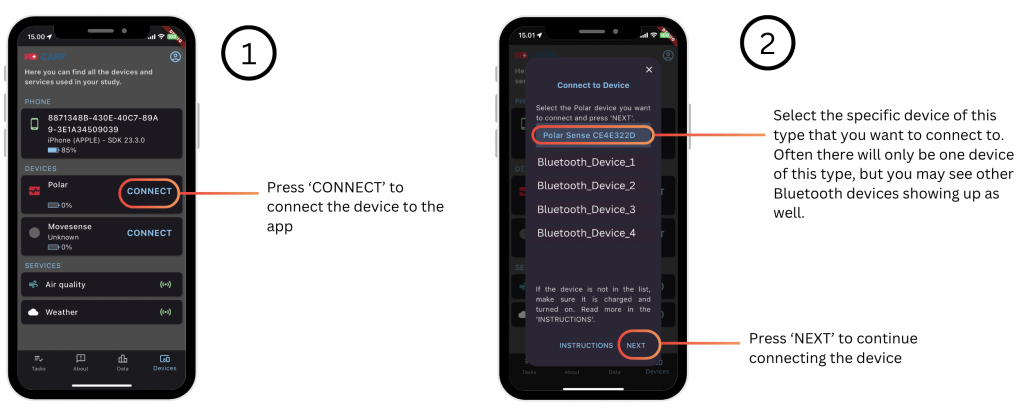
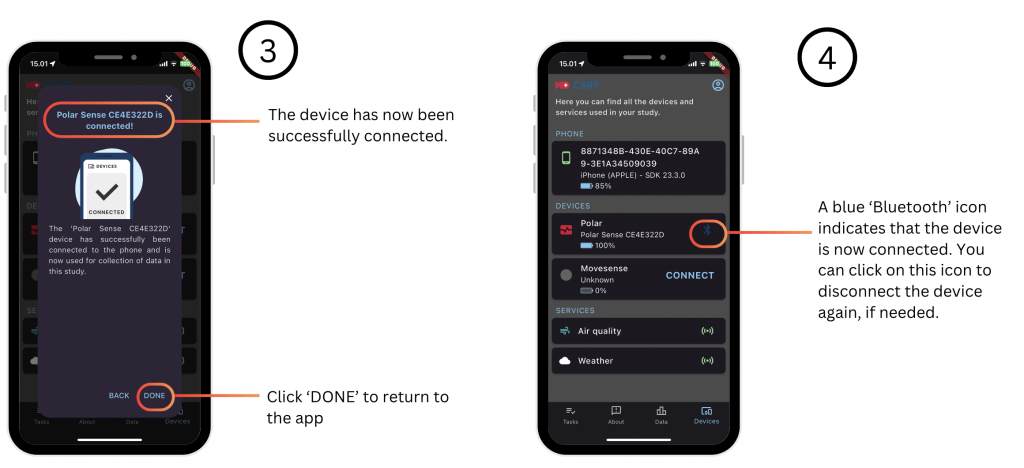
It is important that you have turned on Bluetooth on the mobile phone. This is done in the phone’s “Settings”.
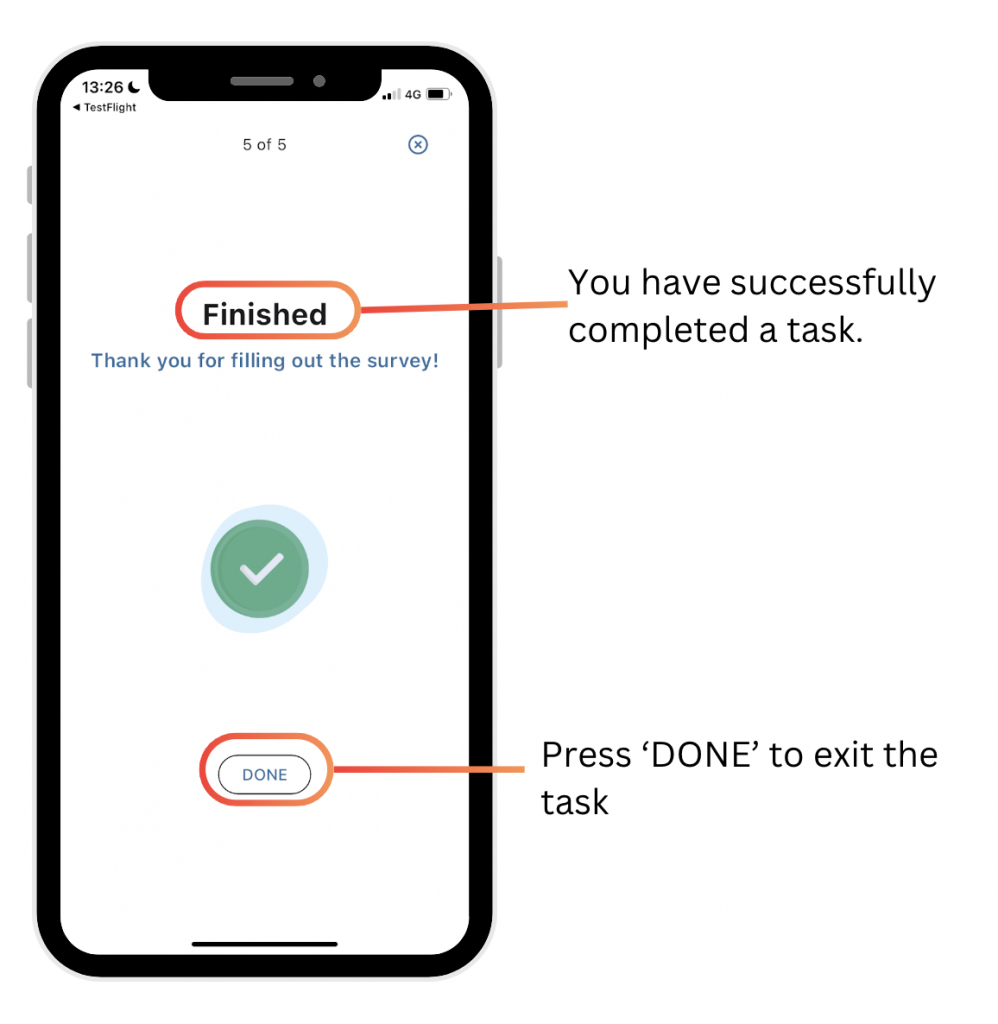
8. Perform Study Related Tasks
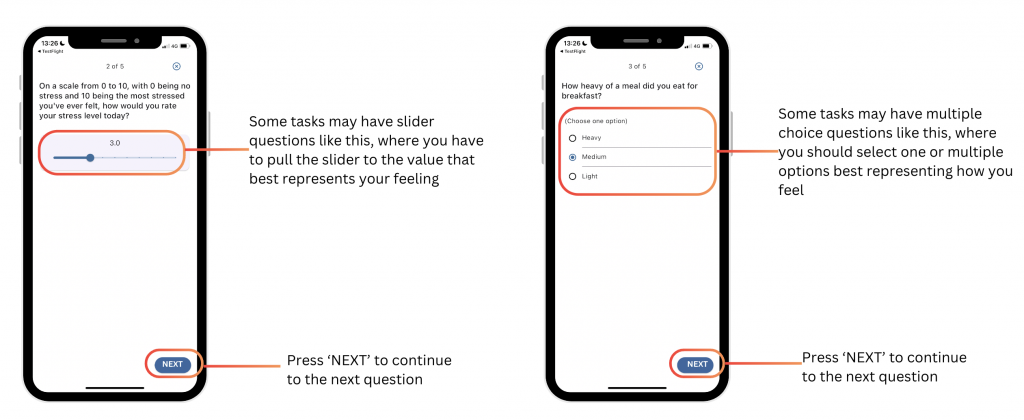
You will use the ‘Tasks’ page regularly during your study. This page contains a list of tasks you need to attend to, such as surveys to be completed.
Some questions in a survey will use sliders as shown below (top right image) and you should slide the circle to the number that represents how you are feeling. Other questions may be multiple choice, where you should select one or more answers that best represent your answer (top left image). When you have completed a task, you will see a screen that shows you have finished the task (bottom left image).
Now you’re familiar with the app! We hope that you will enjoy using it during your participation in a CARP study.